10. Merge Tables (Lookup)
Goal: Match the city population data to the location table. Use a merge (join) for this.
A merge is the Power Query name for a lookup. You match one column in table A with one column in table B. Power BI pulls the values across.
Lookup vs merge
- Excel: VLOOKUP or XLOOKUP. You type a formula in a cell.
- Power Query: Merge. You choose the two tables and the matching column. Power Query does the rest.
Step 1: Start the merge
- Click the Location table in the Queries panel.
- Click Home > Merge Queries.
- Do not choose "Merge Queries as New". Change the Location table itself.
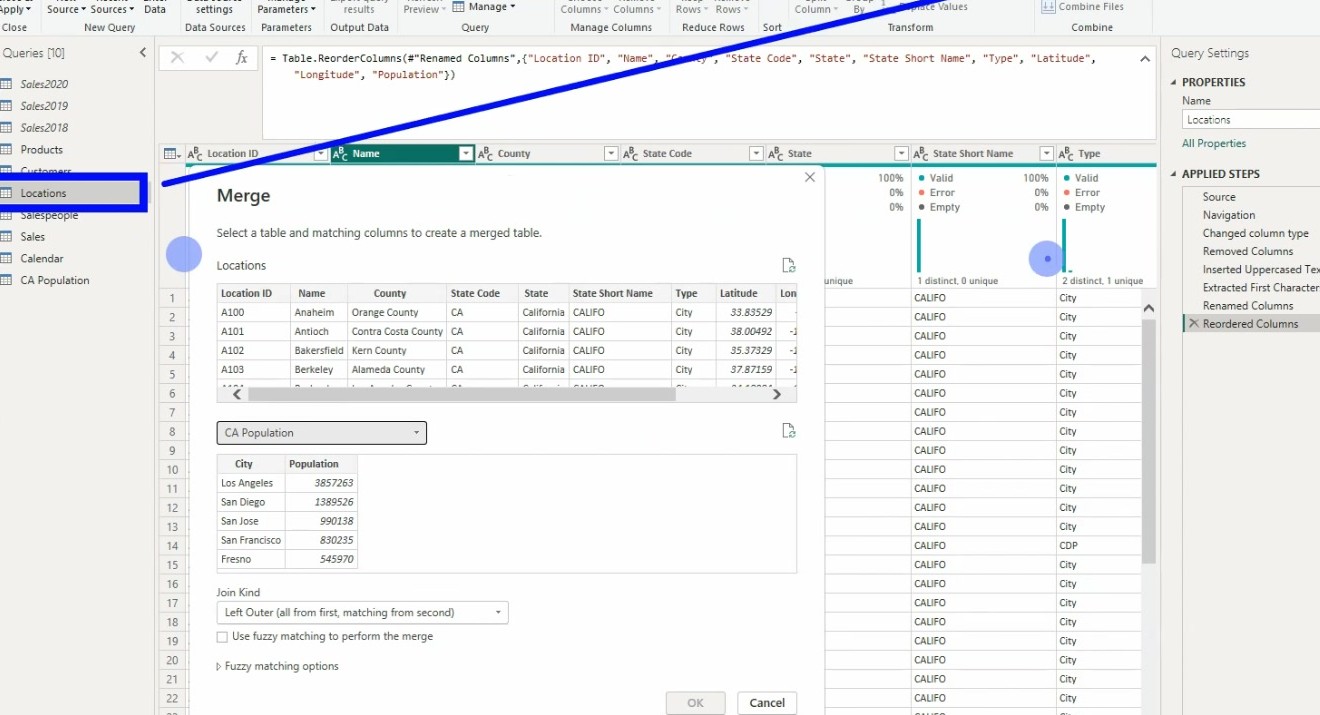 The Merge Queries window with the matching column selected.
Step 2: Select the matching columns
- In the top table, click the City column.
- In the bottom list, select the CA Population table.
- In the bottom table, click the matching column.
- Both column names must be selected. A match preview shows below.
Column selection is important
If you select the wrong column, the match preview is empty. Click the correct column before you continue.
Step 3: Choose the join kind
| Join kind | What it does |
|---|---|
| Left Outer | Keep all rows from the first table. Add matches from the second. |
| Inner | Keep only rows that match in both tables. |
| Full Outer | Keep all rows from both tables. |
- For a lookup, choose Left Outer.
- Keep Fuzzy Matching off. Turn it on only for typo problems.
The trainer uses Left Outer.
Step 4: Expand the new column
- Click OK. A new column appears. Its name starts with the table name.
- Click the expand icon (two arrows) on the column header.
- Uncheck the columns you do not need.
- Check Population only.
- Click OK.
Step 5: Replace the old population column
- Right-click the old Population column.
- Click Remove.
- Rename Population.1 to Population.
Now the Location table has the newest population values.
Two merge steps
Merge has two steps: first select the matching column, then expand the columns you want. Do not skip the expand step.
Step 6: Check for errors
- Turn on Column Profile to see errors fast.
- Find the error rows. In this data, the city "Burbank" has two names: Burbank CT and Burbank CDP. One of them does not match.
- Fix the error rows. You have three choices:
- Filter out the error rows.
- Remove the errors.
- Replace the errors with a text value.
The trainer replaces the errors with the text No data.
Next: Continue to 11. Conditional Columns.